My School Data Base has been created. This is the Data Base window, which can be opened by pressing F11 at any time. On the left hand side there are components of the database and the first one is Tables. The Second is Queries; the third is Forms and so on.
You have three Wizards you can use. Design View, Table Wizard, by entering data.
Use the first one. Design View, which is simple.
Filling details: First column Field Names. Second Column: Data Types. Third Column your notes.
The first table we shall Save As Class
In the First line, give field name: ClassNr and in the Data Type, choose Auto Number.
Second Row give name of Class as field name: ClassName and Data type Text.
Put your mouse on the first row and then click the Key Icon just below the word "Window" in the menu bar. This will make the Autonumber the Primary Key, which is unique as it will appear only once in the table. Duplicates are NOT ALLOWED. In Unique Fields, duplicates are never allowed.
Properties of the field will appear as General and Look Up. Lists below in the window box. In the General you will see: Indexed, duplicates not allowed. It happens only if you set it as primary Key. We shall link this table to the next table of Students.
Now Click File and Save. Give the Table Name as Class.
Data Types.
- Autonumber,
- Text,
- Date
- Number
- Memo
- Currency
- yes/No
Data types in the program, are very important. You can not give your own names. They are to be chosen from the list, which drops down. In Text type, you can have a number or text but can not make calculations with that number. To make calculations you have to choose Number as your Data Type.
Students Table
Primary Key: Name StudentNr Data type: Autonumber
2 Name: FirstName Data Type Text
3 Name LastName Data Type Text
4. Name Age Data Type Number
Creating a Look-up field (gives drop down fields)
5 To create the 5th name, we shall use a Look Up wizard, which will use our Class Table, and set the field with the Primary Key of the Class Table.
To do this click on INSERT in the Menu Bar, and from the drop down, choose LOOK UP.
The Wizard will start.. This wizard also comes up if you specify a data type of a field as Lookup
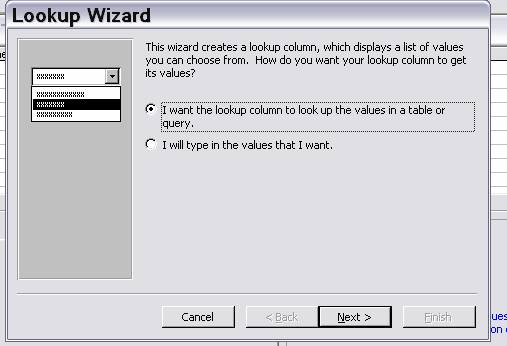
Click Next.
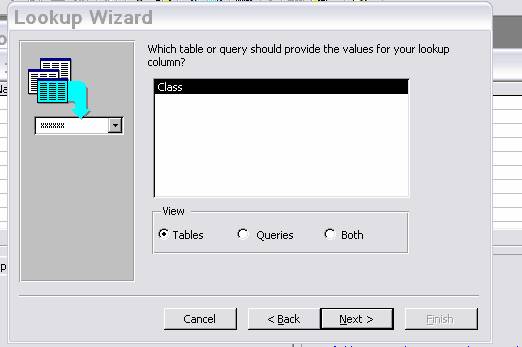
Click Next.
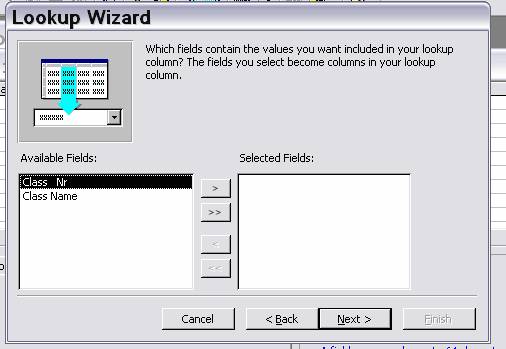
To select one name click > To select all Click >> Select both, as the first will remain in the field and the second will appear in the forms.
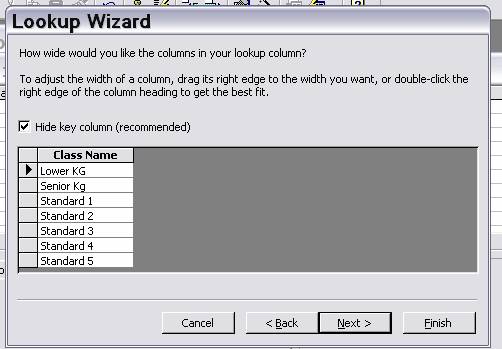
Note the ID Autonumber is hidden. This will appear in the drop down list in the Students Table..
It will now create a relationship with a particular combination, to force all details on the Class Table to reflect in the Student Table. This will be one to many relationships.
Watch as you proceed.
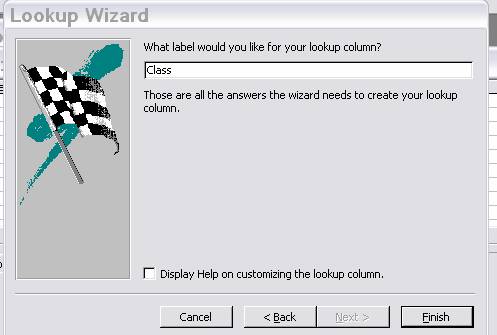
When you click Next, you get the above window, in which you give the field name: Type Class and it will appear on the Table. Now you click Finish and see the table.
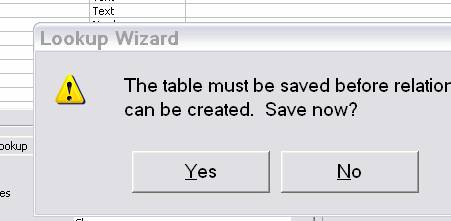
The Wizard will create the necessary job. Click Yes. Before doing so, the next window will ask you for a Table Name. Give it : Students.
Since we did not give a primary Key, the warning will appear as follows
Warning !
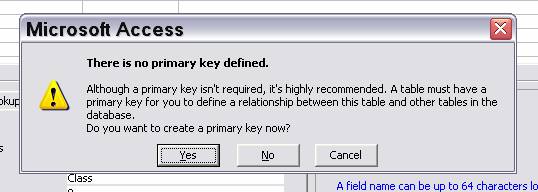
Click YES and the job will be done automatically.
The Student Table has been created, and now you can fill the data in Data View on the table. Give a few names with all the data that is expected in the columns.
Datasheet view
A window that displays data from a table, form, query, view, or
stored procedure in a row-and-column format. In Datasheet view, you can
edit fields, add and delete data, and search for data.
To open a table, form, query, view, or stored procedure
in Datasheet view, go to the Database window, click the type of database
object under Objects, click the database object you want, and then
click either Open or Design. (By default, forms open in Form view. To
switch to Datasheet view in a form, click the arrow next to View on the
toolbar.)
If the table,
query, view, or stored procedure is already open, switch to Datasheet
view by clicking View on the toolbar.
Add New Data
Save or delete a Record
Advance Information
Sort records in Form or Datasheet view
For a list of issues to consider when sorting records
- In Form view or Datasheet view, click the field you
want to use for sorting records. To sort records in a subform, click the
field you want to sort. To sort records in a subdatasheet, display the
subdatasheet by clicking its expand indicator, expand indicator
A button that is used to expand or collapse groups of records on a data access page, and on a datasheet containing a subdatasheet; it displays the plus (+) or minus (–) sign.
and then click the field.
- Do one of the following:
- To sort in ascending order, click Sort Ascending
- To sort in descending order, click Sort Descending .
Notes
- In Datasheet view, when you sort the subdatasheet for
one record, Microsoft Access sorts all the subdatasheets at that level.
- In a form, you can sort on only one field at a time; in a datasheet or subdatasheet, you can select two or more adjacent columns at the same time, and then sort them. Microsoft Access sorts records starting with the leftmost selected column. When you save the form or datasheet, Microsoft Access saves the sort order.
Form view
A window that usually displays one or more whole
records. Form view is the primary means of adding and modifying data in
tables.
To open a form in Form view,
go to the Database window, click Forms under Objects, click the form
you want to open, and then click Open on the Database
window toolbar.
If the form is already open in Design view, you can
switch to Form view by clicking View on the toolbar.
Relationships. - How to ENFORCE RELATIONSHIPS
Click on TOOLS and then on RELATIONSHIPS.
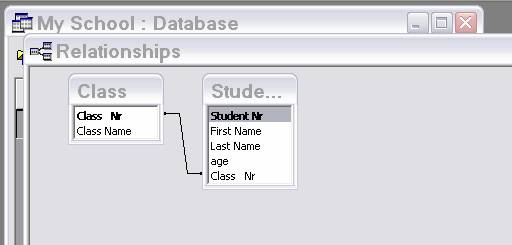
One-To-Many Relationship
This is the basic relationship which needs to be edited to give it greater efficiency. Right Click on the connecting line, and click Edit Relationship.
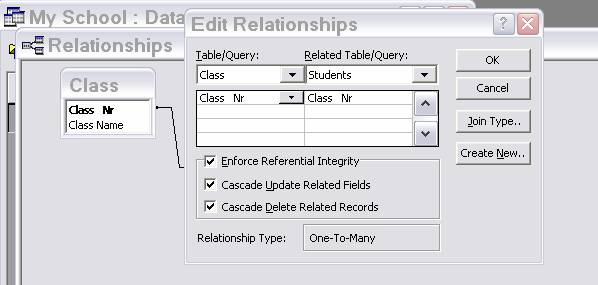
Tick the three boxes and click o.k. This is to Enforce the Referential Integrity about it study in the Help.
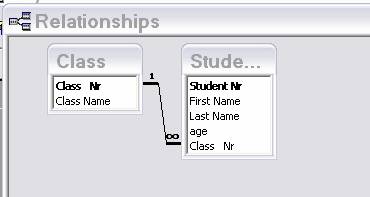
The connecting line has changed. One side it says 1 and on the other side there are two circles meaning many..
Define the default join type for a relationship between two tables
- If you haven't already done so, switch to the Database
window. You can press F11 to switch to the Database window from any
other window.
- Click Relationships on the toolbar to
open the Relationships window.
- Double-click the middle section of a join line
between two tables to open the Relationships dialog box.
- Click the Join Type button, and then
click the desired join type.
Option 1 defines an inner join. This is the default.
Option 2 defines a left outer join.
Option 3 defines a right outer join.
Note The Join Type button won't be enabled if the tables are - linked table (A table stored in a file outside the open database from which Microsoft Access can access records. You can add, delete, and edit records in a linked table, but you can't change its structure.)
Check Tools, Data Base
Utilities, Link Tables Manager, and locate where the original table is
filed.
Note Linked tables are known as "attached tables"
in previous versions of Microsoft Access.
If the tables are in
Microsoft Access format, you can open the database in which they are
stored to set the join type.
Defining the join type for a relationship in the Relationships window doesn't affect the relationship itself; it sets the kind of join that will be used by default when creating queries based on the related tables. You can always override the default join type later when defining a query.
What is referential integrity?
Referential integrity is a system of rules that Microsoft Access uses to ensure that relationships between records in related tables are valid, and that you don't accidentally delete or change related data. You can set referential integrity when all of the following conditions are met:
- The matching field from the primary table (The "one"
side of two related tables in a one-to-many relationship. A primary
table should have a primary key and each record should be unique. An
example of a primary table is a table of customer names that is uniquely
identified by a CustomerID primary key field or column. ) is a primary
key (One or more fields (columns) whose value or values
uniquely identify each record in a table. A primary key cannot allow
Null values and must always have a unique index. A primary key is used
to relate a table to foreign keys in other tables.)
or has a unique index (An index defined by setting a field's Indexed property to Yes (No Duplicates). A unique index will not allow duplicate entries in the indexed field. Setting a field as the primary key automatically defines the field as a unique index.)
- The related fields have the same data type. There are two
exceptions. An AutoNumber field can be related to a Number field with a FieldSize
property setting of Long Integer, and an AutoNumber field with a
FieldSize property setting of Replication ID can be
related to a Number field with a FieldSize property setting of Replication
ID.
- Both tables belong to the same Microsoft Access database. If the tables are linked tables, they must be tables in Microsoft Access format, and you must open the database in which they are stored to set referential integrity. Referential integrity can't be enforced for linked tables from databases in other formats.
When referential integrity is enforced, you must observe the following rules:
- You can't enter a value in the foreign key (One or more
table fields (columns) that refer to the primary key field or fields in
another table. A foreign key indicates how the tables are related -
the data in the foreign key and primary key fields must match, though
the field names do not have to be the same. For example, a Products
table
might contain the foreign key SupplierNumber, which relates to the
primary key SupplierID in a Suppliers table. A foreign key can be
Null; if a foreign key consists of more than one field and any of those
fields is Null, all the fields must be Null.) -
field of the related table that doesn't exist in the primary key of the primary table. However, you can enter a Null (A value that indicates missing or unknown data in a field. You can use Null values in expressions. Null values can be entered in fields for which information is unknown, as well as in expressions and queries. In Visual Basic, the Null keyword indicates a Null value. Some fields, such as those defined as containing the primary key, can't contain Null values.) - value in the foreign key, specifying that the records are unrelated. For example, you can't have an order that is assigned to a customer that doesn't exist, but you can have an order that is assigned to no one by entering a Null value in the CustomerID field.
- You can't delete a record from a primary table if matching
records exist in a related table. For example, you can't delete an
employee record from the Employees table if there are orders assigned to
the employee in the Orders table.
- You can't change a primary key value in the primary table, if that record has related records. For example, you can't change an employee's ID in the Employees table if there are orders assigned to that employee in the Orders table.
If you want Microsoft Access to enforce these rules for a relationship, select the Enforce Referential Integrity check box when you create the relationship. If referential integrity is enforced and you break one of the rules with related tables, Microsoft Access displays a message and doesn't allow the change.
You can override the restrictions against deleting or changing related records and still preserve referential integrity by setting the Cascade Update Related Fields and Cascade Delete Related Records check boxes. When the Cascade Update Related Fields check box is set, changing a primary key value in the primary table automatically updates the matching value in all related records. When the Cascade Delete Related Records check box is set, deleting a record in the primary table deletes any related records in the related table. For more information on Cascade Delete Related Records and Cascade Update Related Fields check boxes,
For information on how to edit an existing relationship and set referential integrity, click
Should I import or link a table?
Note You can link a table only in a Microsoft Access database, not a Microsoft Access project.
Reasons to import data into a table
If you know that you will use your data only in Microsoft Access, you should import (To copy data from a text file, spreadsheet, or database table into a Microsoft Access table. You can use the imported data to create a new table, or you can append (add) it to an existing table with a matching data structure. You can also import database objects from a Microsoft Access database or a Microsoft Access project.) -- it. Microsoft Access generally works faster with its own tables, and, if you need to, you can modify the imported table to meet your needs just like any other table that is created in Microsoft Access.
Reasons to link data from an external table
If the data that you want to use in your Access database is also being updated by a program other than Microsoft Access, you should link it. Using this approach, the current methods of updating, managing, and sharing the data can remain in place, and you can use Microsoft Access to work with the data as well. For example, you can create queries, forms, and reports that use the external data, combine external data with the data in Microsoft Access tables, and even view and edit the external data while others are using it in the original program.
You can also link tables from other Microsoft Access databases. For example, you might want to use a table from another Microsoft Access database that is shared on a network. This is particularly useful if you want to store all of your tables in one database on a network server, while keeping forms, reports, and other objects in a separate database that is copied among users of the shared database. You can easily split an existing database into two databases by using the Database Splitter subcommand on the Database Utilities command on the Tools menu.
Add new data in Datasheet or Form view
- Open a Datasheet,
or form in Form
view.
- Click New Record (Insert menu) Go To
New Record (Edit menu) Moves to the end of the form or datasheet so you
can enter a new record.) on the toolbar.
- Type the data you want, and then press TAB to go
to the next field.
- At the end of the record, press TAB to go to the next record.
Save a record in Datasheet or Form view
Microsoft Access automatically saves the record you are adding or editing as soon as you move the insertion point to a different record, or close the form or datasheet you are working on.
- To explicitly save the data in a record while you are editing it, click Save Record on the Records menu.
Delete a record in Datasheet or Form view
- Open a Datasheet,
or form in Form
view.
- Click the record you want to delete.
- Click Delete Record (Edit menu) - Deletes the selected record or records from the form or datasheet. To select a record, click the record selector .) on the toolbar.
Note When you delete data, you might want to delete related data in other tables. For example, if you delete a supplier, you probably want to delete the products that the supplier supplies. In some cases, you can make sure the proper data is deleted by enforcing referential integrity and turning on cascade deletions.
Why should I use cascading updates or cascading deletes?
For relationships in which referential
integrity is enforced, you can specify whether you want Microsoft
Access to automatically cascading update (For relationships
that enforce referential integrity between tables, the updating of all
related records in the related table or tables when a record in
the primary table is changed.)
and cascading delete (For
relationships that enforce referential integrity between tables, the
deletion of all related records in the related table or tables when a
record in the primary table is deleted.) related records.
If you set these options, delete and update operations that
would normally be prevented by referential integrity rules are allowed.
When you delete records or change primary
key values in a primary table (The "one" side of two
related tables in a one-to-many relationship. A primary table should
have a
primary key and each record should be unique. An example of a primary
table is a table of customer names that is uniquely identified by a
CustomerID primary key field or column.)
Microsoft Access
makes necessary changes to related tables to preserve referential
integrity.
If you select the Cascade Update Related Fields check box when defining a relationship, any time you change the primary key of a record in the primary table, Microsoft Access automatically updates the primary key to the new value in all related records. For example, if you change a customer's ID in the Customers table, the CustomerID field in the Orders table is automatically updated for every one of that customer's orders so that the relationship isn't broken. Microsoft Access cascades updates without displaying any message.
Note If the primary key in the primary table is an AutoNumber field, setting the Cascade Update Related Fields check box will have no effect, because you can't change the value in an AutoNumber field.
If you select the Cascade Delete Related Records check box when defining a relationship, any time you delete records in the primary table, Microsoft Access automatically deletes related records in the related table. For example, If you delete a customer record from the Customers table, all the customer's orders are automatically deleted from the Orders table (this includes records in the Order Details table related to the Orders records). When you delete records from a form or datasheet with the Cascade Delete Related Records check box selected, Microsoft Access warns you that related records may also be deleted. However, when you delete records using a delete query (A query (SQL statement) that removes rows matching the criteria you specify from one or more tables.) Microsoft Access automatically deletes the records in related tables without displaying a warning.
Selecting fields and records in Datasheet view
The following table lists mouse techniques for selecting data or records in Datasheet view.
| To select | Click |
|---|---|
| Data in a field | Where you want to start selecting and drag across the data. |
| An entire field | The left edge of the field in a datasheet, where the pointer changes into (plus pointer The pointer that appears when you move the pointer to the left edge of a field in a datasheet. When the plus pointer appears, you can click to select the entire field.) . |
| Adjacent fields | The left edge of a field and drag to extend the selection. |
| A column | The field selector A small box or bar that you click to select an entire column in a datasheet.  |
| Adjacent columns | The field name at the top of the column and then, without releasing the mouse, drag to extend the selection. |
| A record | The record selector. |
| Multiple records | The record selector of the first record, and then drag to extend the selection. |
| All records | Select All Records on the Edit menu. |
The following table lists keyboard techniques for selecting data or records in Datasheet view.
| To select | Do this |
|---|---|
| Data in a field | Move the insertion point to the start of the text you want to select, and then hold down SHIFT and press the arrow keys to move to the end of the selection. |
| An entire field | Move the insertion point to the field, and press F2. |
| Adjacent fields | With a field selected, hold down SHIFT and press the appropriate arrow key. |
| The current column | Press CTRL+SPACEBAR. |
| The current record | Press SHIFT+SPACEBAR. |
| Multiple records | Press SHIFT+SPACEBAR, and then SHIFT+UP ARROW or SHIFT+DOWN ARROW. |
Bookmark with:
| < Prev | Next > |
|---|