Forms

Table Tool Bar
Creating a Form for Students Table.
View Student Table in Data View and click on the wizard that crates a form automatically.
Form in Design View
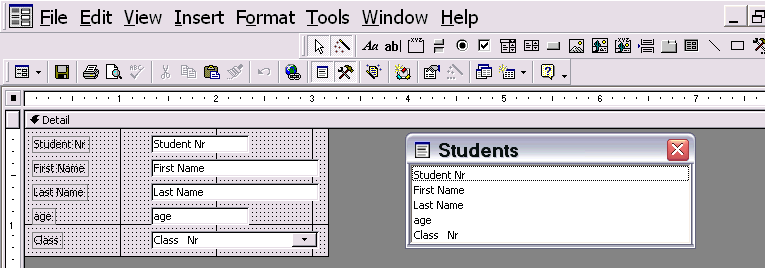
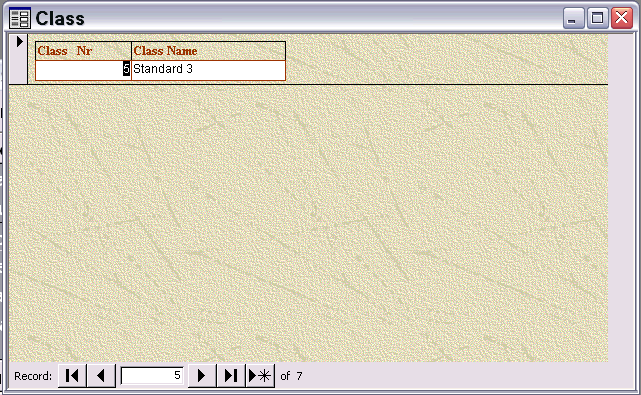
Form in :Form View"
You can now try and prepare your Student Table from any imaginary Class.
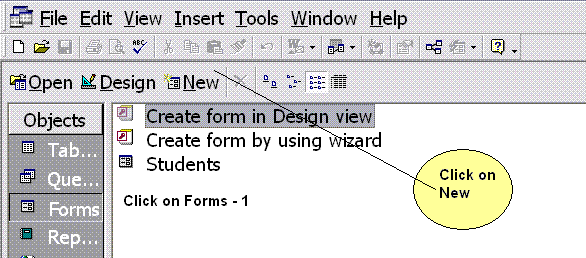
Creating a New Form in Design View.
Results:
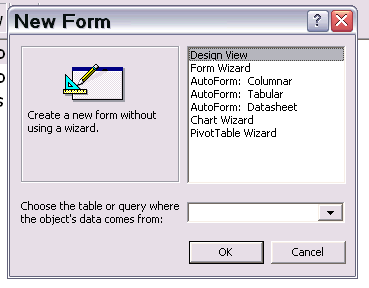
If you choose Design View, you can design your own form, with whatever colors and fields you want.
Form Wizard creates a form for you from a set template, based on a table or query you specify which you can modify later..
Try both.
You can use Help in the Menu Bar, and search for contents, Index etc and find more details on a specific subject. You will learn more as you try and attempt. It will be an interesting mental journey occupying your time well, for your own betterment and those of others, with the knowledge you will gain.
Select Form Wizard, and in the table box, from the drop down Menu, select Class. and click OK.
A new window will appear, with field lists on the left. Click >> arrows and it will move to the right.
Click Next. You will have 4 options: Columnar, Tabular, Data Sheet and Justified. Choose Justified. and click next..
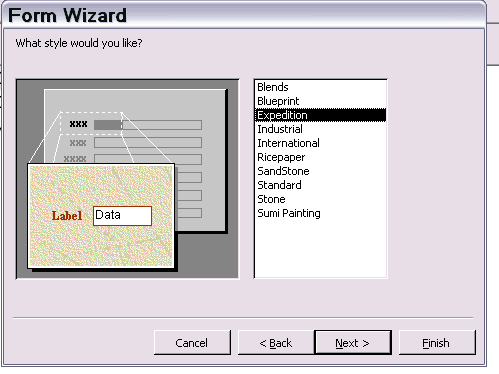
Blends, Blueprint etc and form templates. Browse and choose the one you like. Click Next.
If you want to make modifications to your form now, opt for modify or else click finish.
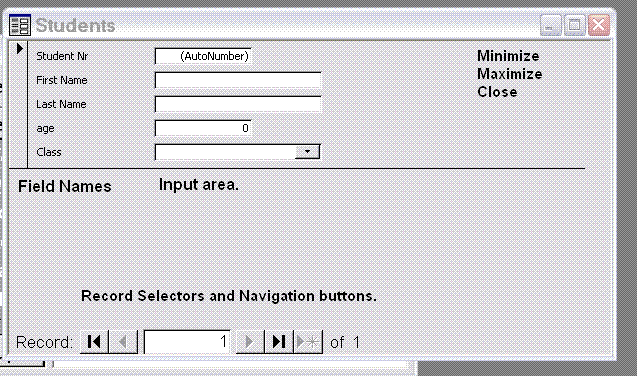
Right clicking on the top band you can choose to view in Design View or Data Sheet View. You can use this form to build your table data.
Creating Form in Design View
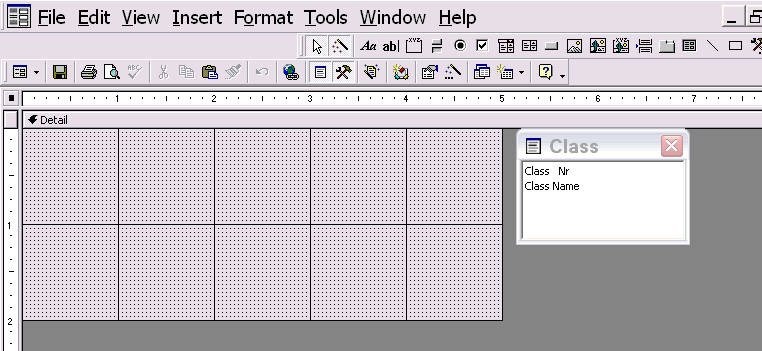
When you choose Design View and choose the table Class, you get this window on which you have to work.
Put your mouse on the field names and press down the shift key and select all fields. Then holding the shift key down, drag the fields to the body of the form. They will settle there. You can move each field to the place you want on the form. To align the frames select, format, align. To align, click on the labels, and place them one below the other, and hold the shift key down, so that both are selected. Then click on Format, and Align then to the Left. .
To Change the background colors, do the following.
Right click on the body of the form.
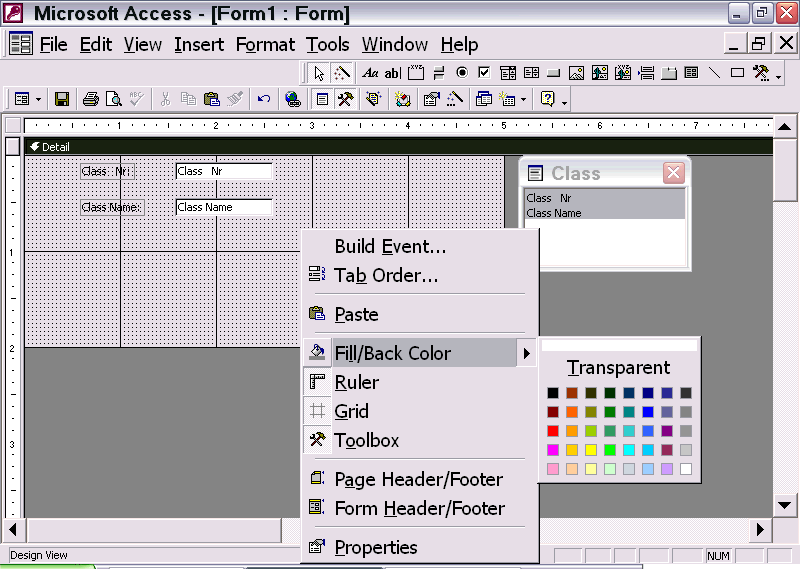
Click on Fill Back Color and choose the colour from the right side palette.
You can use Ruler to fix the location of your fields. Grid to lock the frames, and Tool Box to use the fools. Use Page and Header properties to create these.
Moving labels to the Form Header.
Note the above picture, and you will see Ruler and Grid as you right click in the area of the detail. To view the ruler or grid, you have the first click View and select it in its options. Then you will find the ruler and grid appearing. If not they will be not seen.
The labels lie approximately 1" away from the left border, as per the top ruler. If you place your mouse pointer on this ruler, just vertically above the labels, and click the left mouse button, they will be selected. Once they are selected, you cut them by pressing CTRL+X - now click View, and select Form Header/Footer Two cross bars will appear on the form, dividing it into Header and Footer. Click the top bar of the Header and it gets selected. Since you had clicked CTRL+X - the data you had copied is on the clip board, which is a virtual area on the Computer.,. Now if you press CTRL+V the data will get copied into the header, and the text boxes will have no labels. The labels will be one below the other in the Header. Now you have to move them where you want to place them
Format/Align.
You can align each. label with one another. You have to select two labels, by holding the shift key down, and pressing on them with your mouse pointer. Or if you have arranged them horizontally but unevenly, then click on the left ruler approximately in line with the labels, and all the labels will be selected. You then align them with one stroke of Format/Align/Top and all will be aligned with the highest label. Now click on Format in the Menu Bar, select Align, then to the Top. Both will be aligned on the top. You can move one label or a group of labels in any direction, by using the CTRL and arrows.
Place the field boxes in line with the labels in the details area, and arrange the appearance. If you are going to select "Continuous" form, then place all the fields right at the top of the form - detail area and raise the lower part of the detail bar up, till it touches the text boxes.
You can place derived data like sum of fields etc in the footer.
If you do not want a field to be shown, click "No" to visible property in Format Tab of the property window.
Click on Properties to view the properties of the form.
Setting Properties and Modifying them.
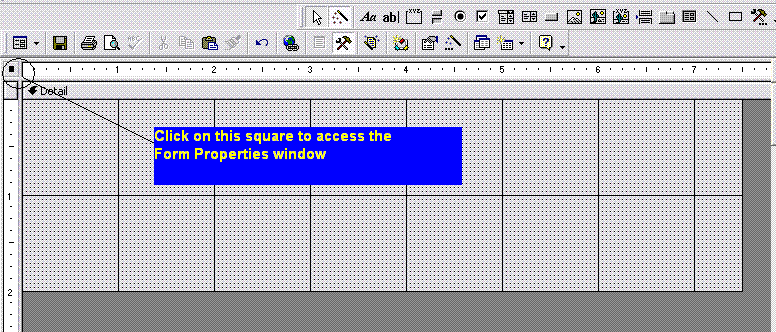
Click on the small square at the left hand top corner and the Properties of the Form appear as follows:
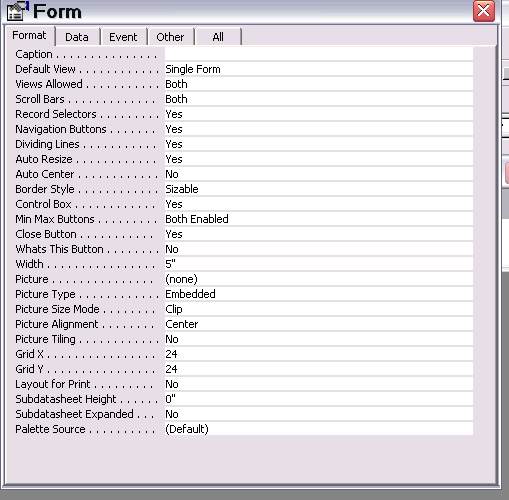
At the moment, we shall leave them as they are. Later on, we will require to modify our forms.
Forms with Derived Data
Sometimes, we need to know certain information, which requires calculation, like adding, multiplying etc. It is cumbersome to do it on a calculator, as it takes time. The computer is devised to do it for you.
Let us say, we need to know the balance in the bank account, or cash box. You need a field in the Bank Account which shows the opening balance in currency. You can also avoid it, but entering the first entry in the bank transactions as your deposit in the bank to represent the opening balance.
You have to redesign your Bank Transactions Form. The automatic generated form has to be discarded and you have to create a new sub form.
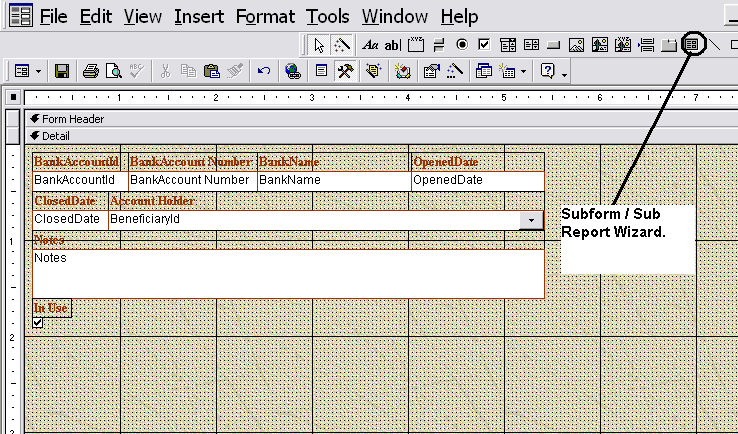
Create Sub Form in Design Mode.
Properties Window
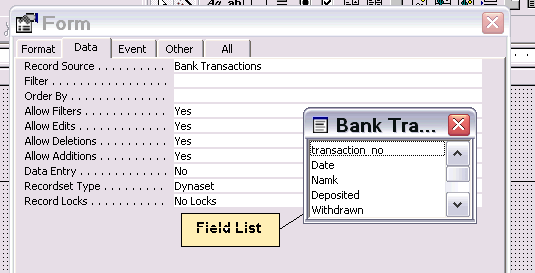
At the end of the row you will see a drop down arrow, and it will list the tables and queries, select Bank Transactions. Drag all the fields from the Field List by selecting them with the mouse, holding the shift key down, on to the body of the form. It does not have to be in any set order, as we want to make a Data View form.
On the Form Menu Bar, click on VIEW and then select Form HEADER AND FOOTER.
On the top left corner you will see a square which you should click and set the form property to Data Sheet.
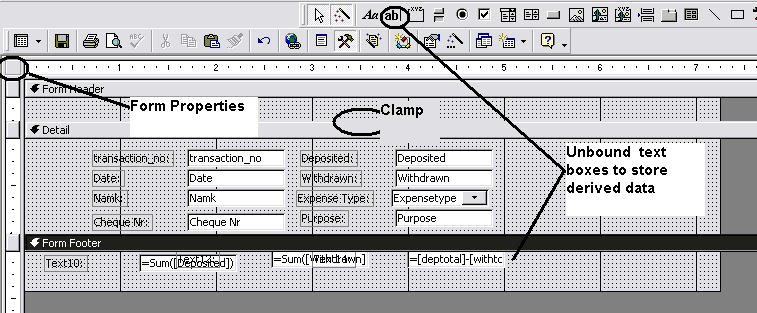
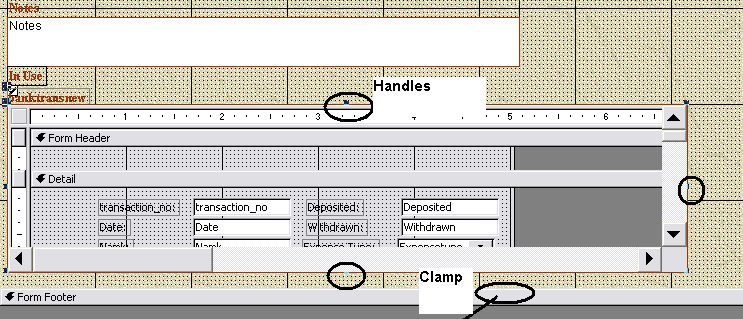
Re arrange the fields so that instead of a square form, you will get rectangular space across your monitor. To do it, just click each field, a hand will appear and you can then drag and move it to another place. If you place the mouse just on top of the Form Footer Bar, you will find it changing into a clamp. You can move the bar up or down to form your rectangle.
Set the unbound text boxes to hold the total of the deposits, and withdrawals. The formula for total is = sum([tieldname] Give it a distinctive Other name ; deptotal and format it to currency. Make a third unbound box whose other name is balance and its formula will be =[deptotal] - [withtotal] - format this box to currency.
You can resize the form by clicking on the handles and moving them in vertical or horizontal directions.
The Unbound Text box will produce a cross hair pointer, which has to be placed in the footer area, and drag it horizontally to make a box. Right Click in the box and click on PROPERTIES. In the properties window, click on DATA. - Look three asterisks on the extreme right and click on them, it will bring up the expression builder.
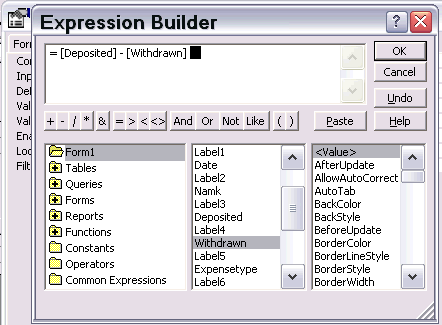
You see the fields of the form, including names of labels etc. Point your mouse on the field, it high lights and then click paste. First type = then paste field deposited, then type the minus sign and paste field withdrawn. Then press OK. This will generate a number, as both Deposited and Withdrawn are currency. So you have to format the number, by clicking on the Format tab of the Properties and declare it as currency. Then click OK.
In the control source you will find = [Deposited] - [Withdrawn] In the Format: Currency. Now click on "Other" and you will find a text nr. label. Change it to a name you will recognize such as balance. Since we can not see the footer in data view, we have to enter this data in another part of the main form, so we place both main form and sub form on a common form, similar to the one generated by the automatic wizard.
To do this first load the Bank Accounts form without the sub form.
Just like the Unbound Text wizard, this too will generate a cross hair pointer which you use to draw an area below the main form to hold your sub form. by stretching it cross wise to form a rectangle.
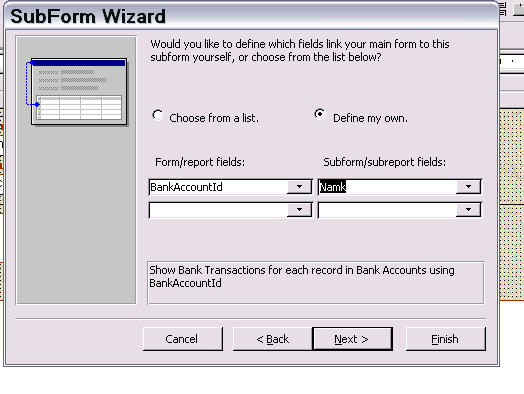
It brings up another window, in which you have to define the linked fields.
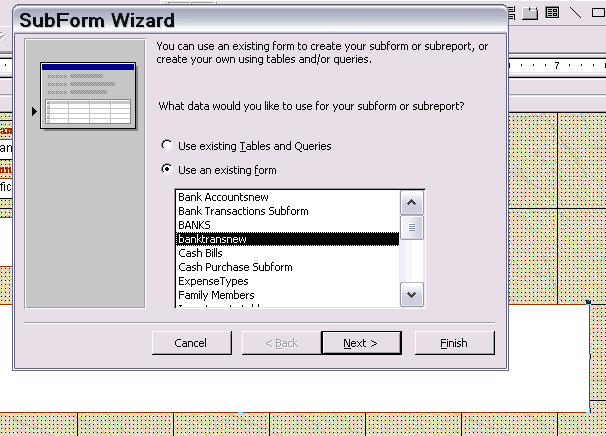
I had given the new transactions form the name banktransnew and I click on it and selected it, and now I click on next.
Creating a Unbound Text Box on the Main form
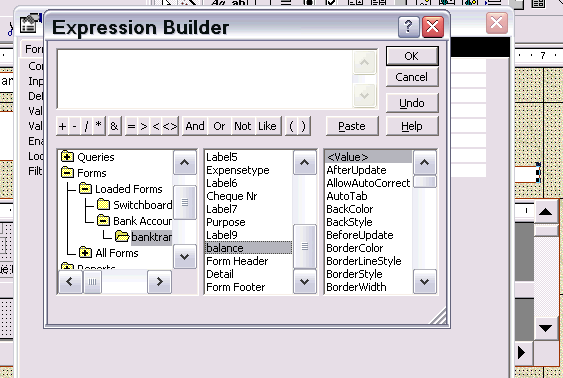
To show the balance on the Subform, which is now in Data Sheet View, you have to transfer tit to the main form. this is done with the help of the Expression Builder.
The Forms has a + sign to its left. Click it and it opens. Go till you find the sub form. On the Subform you will find a field called balance. (This is the name you gave in Other tab, in its properties, when you created this unbound text.) Select balance, and paste. It will produce =[banktransnew].Form![balance] - formula which the computer will recognize. Change the format of this field to Currency.
Final Form

As you finish, you will see many items have been left out, like in the above case, the label of the balance is Text24 and that has to be refined in design view, by changing its value, in the caption property of the box.
You may want to rearrange the fields, change the color, size of the font etc. As you go on doing it you become familiar with the program and eventually it will become second nature. First try to serve yourself, before trying to sell out your work. You may like to share it with uncritical friends.
I myself do not claim to be a perfect programmer, but since it is my interest to help others, I am starting the job and leaving the ending to you.
Bookmark with:
| < Prev | Next > |
|---|