Design View

Create an option group with check boxes, toggle buttons, or option buttons
You can create an option group on your own or you can have Microsoft Access create your option group for you by using a wizard. A wizard speeds up the process of creating an option group because it does all the basic work for you. When you use a wizard, Access prompts you for information, and then creates an option group based on your answers.
Note Toggle buttons are not available in data access pages.
Tip If you want to present more than a few options, use a list box, a combo box, or a drop-down list box instead of an option group.
Create an option group without a wizard
- Open a form in Design view, a report in Design view, or a
data access page in Design view.
- Click the Control Wizards tool in the toolbox
if it's pressed in. This turns off the wizard.
- In the toolbox, click the Option Group tool .
- Do one of the following:
- If you want to create an unbound option group, click where
you want to place the group frame.
- If you want to create a bound option group, click Field List on the toolbar to display the field list, and then drag the appropriate field or column from the field list to the form, report, or data access page. Fields and columns are placed in the option group as text boxes. In a form or report, if the field list button or command isn't available, you need to bind the form or report to a record source. In a data access page, if the field list is empty, you must connect the page to a database.
Note You must drag the field or column from the field list. If you click the field in the field list and then click the form, report, or data access page, the control won't be bound.
- If you want to create an unbound option group, click where
you want to place the group frame.
- In the form or report toolbox, click the Check Box , Option
Button , or the Toggle Button tool . In the data access page
toolbox, click the Option Button .Then click inside the group frame
where you want the upper-left corner of the check box, option button, or
toggle button to appear. When the user rests the pointer over the frame in a
form or report, Microsoft Access highlights the option group to indicate
that controls placed within it become part of the option group.
When Access creates the first control inside an option group on a form or report, it sets the control's OptionValue property to 1. On a data access page, you must set the Value property of each option button to a number or any text that’s meaningful for the field the group frame is bound to.
- Repeat step 5 for each control you add to the option group. On a form or report, Access sets the OptionValue property of the second option to 2, the third to 3, and so on.
Notes - check MS Access Help
- For information on aligning the controls in the group frame to
each other in forms and reports, click .
For information on aligning the controls in a group frame to each other in
data access pages click .
- For information on spacing controls evenly in forms and
reports, click .
- To facilitate data entry, you can make the most commonly
chosen option the default.
How?
- If you create a check box, option button, or toggle button outside an option group, and you want to add that control to an option group, you must cut and paste the control into the option group (select the option group frame before you paste). When you cut and paste, Microsoft Access sets the OptionValue property for the control on a form or report to -1 so that you must reset the property to the value you want. If you drag an existing control into a group frame, the control doesn't become part of the option group.
Customize Tool bar.
Click View, Toolbars, customize. Select Tool Box, and click Wizards, then Options Group and toggle Buttons one after another and place in in the menu bar, if these are not already there. Then close the dialog box.
Find the "other name" of the group.
On the left hand top of the frame, of the Options Group, you will find a square handle, and in you right click on it, and then click properties, you will find what name has been given to the group. This name is needed in the contional statement in the Macro.
In the above example, it is CompanyNameFilters
Option Group CompanyNameFilters Properties
| Format | Nil |
| Data | Default Value 27 |
| Event: | Customer Phone List.Alpha Buttons After UPdate. (Macro) |
| Other | Filter Name "CompanyNameFilters" |
| Status Bar text | "Select a filter for the company name." |
Toggle Button Properties
A
| Format | &A |
| Data | 1 |
| Event | Nil |
| Other | A |
Macros:
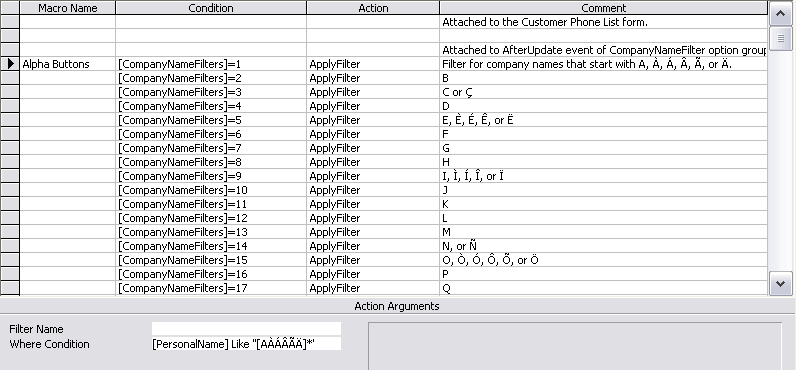
Action: Apply Filter where condition is [filtername]=1 (toggle button A) Where condition is [fieldname] Like "AAAAA]* (First Name)
The different types of A.
[PersonalName] Like "[ZÆØÅ]*" for Z
Macro table: detailed view of the above macro
| Macro Name | Condition | Action | Remarks |
| Alpha Buttons | [CompanyNameFilters]=1 | ApplyFilter | Filter for company names that start with A, À, Á, Â, Ã, or Ä. |
| [RecordsetClone].[RecordCount]>0 | GoToControl | ||
| StopMacro | stop macro | ||
| [RecordsetClone].[RecordCount]=0 | MsgBox | ||
| ShowAllRecords | |||
| SetValue | Press All button | ||
| ` |
Apply filter where [PersonalName] Like "[ZÆØÅ]*" for Z
fileter conditions:
| A | [PersonalName] Like "[AÀÁÂÃÄ]*" |
| B | [PersonalName] Like "B*" |
| C | [PersonalName] Like "[CÇ]*" |
| D | [PersonalName] Like "D*" |
| Message Box | There are no records for that letter. |
| Beep | Yes |
| Type | Information |
| Title | No records returned |
FORM PROPERTIES
Data
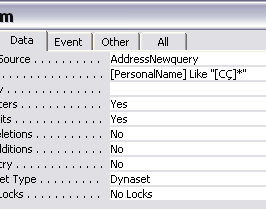
Event: AfterUpdate; Macro Customer Phonelist.
The same concept can be used to sort other files. Like Recipes by food types.
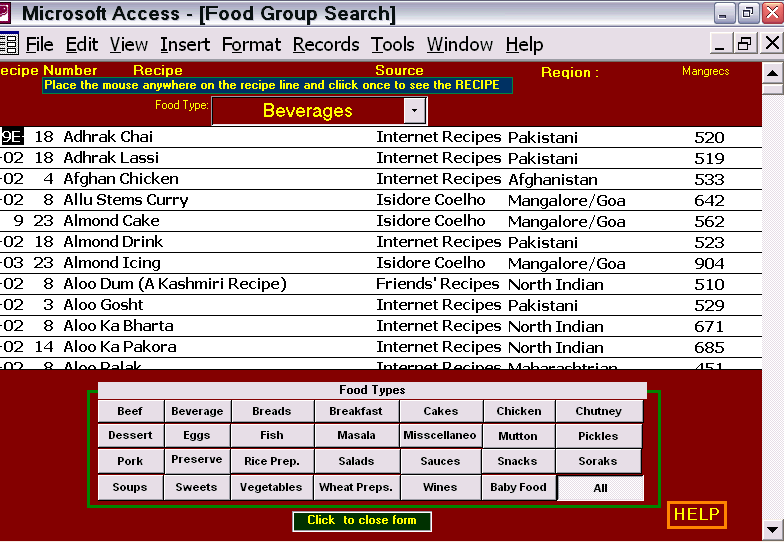
In this ToggleButtons represent Food Types.
the filter is : [FoodType]=13
Each toggle button has the other name, a number which is same as that of the food type.
Design View of the Form
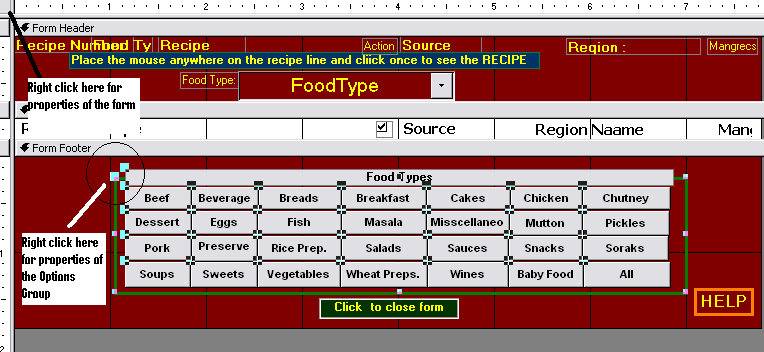
On the top left corner, right click on the square handle, and select properties. Look at the speficcation in Format, Data and Event properties. When a toggle button is pressed, the data filter changes and selects a particular category.
In the toggle buttons in Options Group area, click on the top left corner to expose the handle and then right click on it. Check also the properties of Data, Event and Other.
Open a specimen MS Access database and see how they do it, and how the specifications are. You can import these forms into our database, by clicking on Get External Data in the Database window.
Bookmark with:
| < Prev |
|---|