Reports can be created either using a Wizard or in Design View.
Steps with a Wizard.
Select Wizard and click New.
Dialog Box appears.
Click Report Wizard, give the file name.
Select a table, in the next dialog, select the fields, and click next.
You can group the report. In the Students table, you can group by Class and within class print all the names of the students.
You can sort the names in ascending order of the last names..
Select one of the different options and choose portrait or landscape.
Select Print Template.
Change the Print Report Name if you want. Either choose preview or modify.

This report requires refinement. Class Number should also have the Class Name, which is not in the Student Table. So we have to make a query with two cables, Class and Students and link the two tables by joining the two common fields in either table. See Class and Student Query

Student Report in Design View
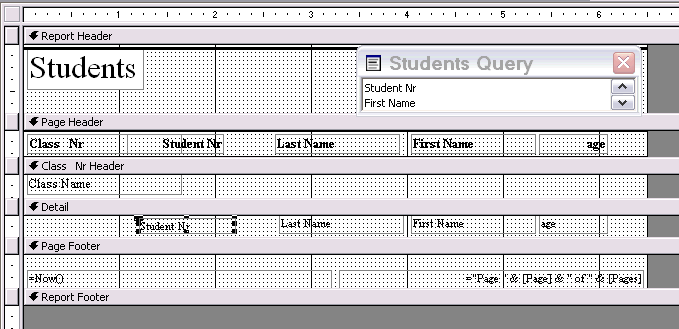
Click on the left top square and get the report properties. Click Data Tab. Click on the drop down arrow, and select Student Query. Click Class Nr on the design form, and right click and get properties, get data and drop down the names of fields and select Class Name.
In the detail change the position of the Student Nr to the left, by dragging. Rearrange the Last Name to the right and then preview the report. If all goes well, you save, or else start making more changes.
Note the different headers: Page Header, Class Header etc. It is obtained by clicking the View and selection sorting and grouping.
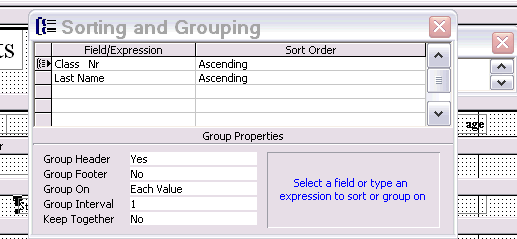
Class Nr has a group header, in which you change and put the Class Name. You can select Class Name here as well, by dropping down the list and selecting class name. But since you do not want the ascending list by class name but by number, it is better to leave it as it is.
Report with Sub Reports
Design View
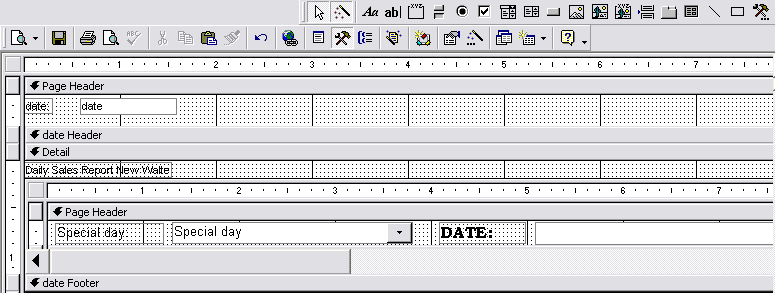
Main report has Date as a unique field. Prepare the report as the Calendar as the source.
In the detail, click Sub report from the menu bar wizard and draw a rectangle in the detail space, and the wizard will point out the other reports you have prepared. Choose the one which has date, and define this link with the main form. Then for with the handles space the report.
Creating Report with a Wizard
- In the Database window, click Reports under Objects.
- Click the New button on the Database
window toolbar.
- In the New Report dialog box, click the
wizard that
you want to use. A description of the wizard appears in the left
side of the
dialog box.
- Click the table or query that contains the data
you want to
base your report on.
Note Microsoft Access uses this table or query as the default record source for the report. However, you can change the record source in the wizard and select fields from other tables and queries.
- Click OK.
- If you clicked Report Wizard, Chart
Wizard, or
Label Wizard in step 3, follow the directions in the wizard
dialog
boxes. If you click AutoReport: Tabular or AutoReport:
Columnar,
Microsoft Access automatically creates your report.
If the resulting report doesn't look the way you want, you can change it in Design view.
You can use Microsoft Access Help, and look for Contents. Go down to working with Reports, and learn more from there.
Sub Reports
A sub report is a report that's inserted in another report. When you combine reports, one of them must serve as the main report. A main report is either bound or unbound; that is, it is or isn't based on a table, query, or SQL statement.
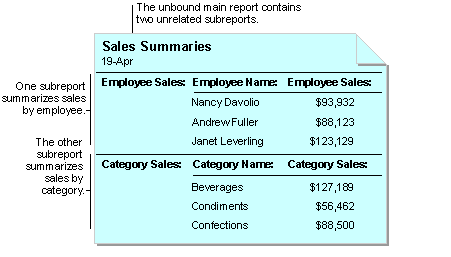
Data from unrelated record sources in a main report with two sub reports
An unbound main report can serve as a container for unrelated sub reports that you want to combine.
Data from one record source in a main report and sub report
You bind the main report to an underlying table, query, or SQL statement when you want to insert sub reports that contain information that's related to the data in the main report. For example, you can use the main report to show detail records, such as every sale in a year, and then use a sub report to show summary information, such as the total sales for each quarter.
Create a sub report
How you create a sub report depends on whether you want to create a sub report in an existing report or add an existing report to another existing report to create a report and sub report.
Create a sub report in an existing report
If the sub report will be linked to the main report, make sure you've set up the table relationships correctly before using this procedure.
- Open the report you want to use as the main report
in Design
view.
- Make sure the Control Wizards tool in
the
toolbox is pressed in.
- Click the Subform/Subreport tool in the
toolbox.
- On the report, click where you want to place
the subreport.
- Follow the directions in the wizard dialog boxes.
When you click the Finish button, Microsoft Access adds a subreport control to your report. It also creates a separate report that is displayed as the subreport.
Bookmark with:
| < Prev | Next > |
|---|